The rule of thirds is a compositional guideline used in photography to make your image stand out and appear more visually pleasing to the viewer. This concept is carried out by placing the subject or horizon in either the left, right, upper, or lower third of your image.
Whilst this produces some stunning images it is important to remember that there are not set rules in photography, and the rule of thirds does not apply to every photo.
In this article, we’ll delve further into the world of thirds and learn more on how it works and when to use it.

So, we know that the rule of thirds is commonly used to make your image better, but what actually is it?
If you look at the image below you will see a grid. Within the grid there are two horizontal lines and two vertical lines which are spaced equally apart to form nine identical sections, simultaneously creating four intersectional points. It is along these gridlines and at these intersectional points in which you want to position most of your subject.

Using the gridlines is a good place to start when starting out.
When photographing a subject, the rule of thirds recommends using these lines. In still life photography you will most likely use the right and left vertical gridlines. Placing your subject on, or near, one of these lines can either create a sense of balance and harmony to the image, or a dynamic scene where the viewer is often drawn to the focus point and then taken on a journey through the rest of the photograph.

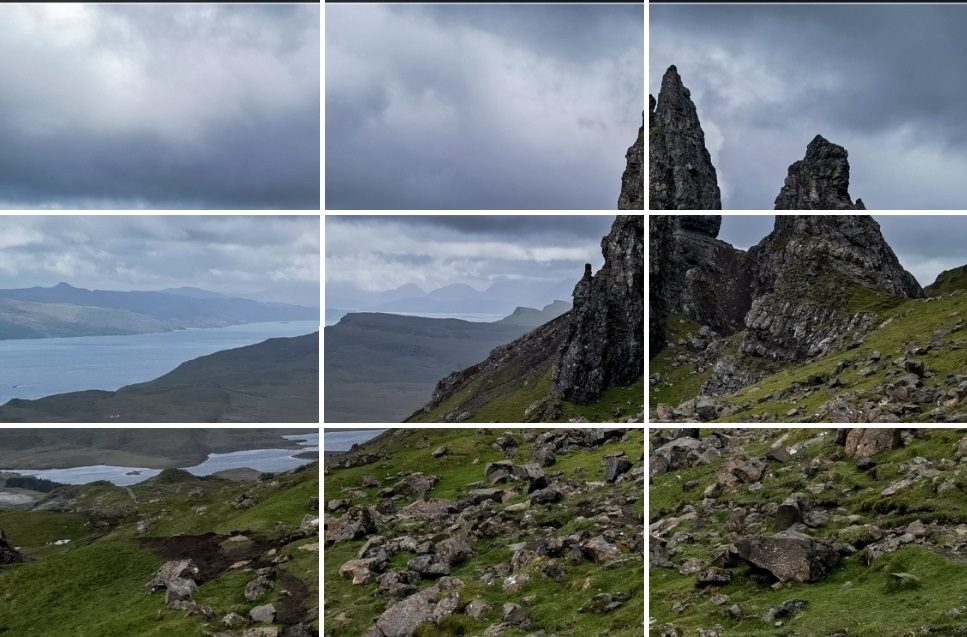
Alongside the left and right thirds, are the upper and lower horizontal thirds. These are particularly useful in landscape photography. It is best to try and get the horizon line either along the bottom gridline, creating more sky, or the top gridline, showing more land.


In addition to the gridlines, you also have four intersectional points. These points can be used to place points of interest on your subject. For example, if you are doing portrait or pet photography, you may want to line your subjects’ eye with one or two of these intersectional points. Or you might want your subject to take up a large portion of the scene.


Using these gridlines and intersectional points can help frame your image better. You do not need brilliant photography skills or training to use the rule of thirds. Most cameras will have a grid overlay which you can find in the settings and use. Once you have trained your eye to follow these lines, you may find yourself naturally taking more photos using this method.
In contrast, you can still produce stunning images without using the rule. Despite its name, the rule of thirds is more of a guideline and doesn’t necessarily mean you should follow it for every image. Some cases where you might choose to ignore it are with symmetry, architectural shots, or perhaps if your subject is facing forward. In these cases, you may want to make your image more central.


Ultimately, you are in control of your photos, and it is your judgement that decides what makes a good image, but the rule of thirds is arguably one of the best guidelines to follow, especially if you are just starting out your photography journey.
The more you practise the better your photos will get. You may even find that you will be able to use the rule of thirds more than one way in one image.
Try to get into the habit of asking yourself two questions when you are next out taking photos:
What are your points of interest and where are you purposefully placing them?
That way, you can define your points of interest and can immediately place them along a rule of thirds gridline or intersectional point. Thus, creating a beautifully balanced composition.
A point worth mentioning too, when reviewing your photos at a later stage, if you feel that you didn’t capture anything particularly special, a simple crop and reframe to fit the rule of thirds composition might just make the difference.
Having read this article, hopefully you will have a little more understanding about the rule of thirds, how to use it, and when to use it.
Hope you all have a lovely day,
Happy ClickASnapping,
Lily