So, You’ve gone and bought yourself a nice Digital Single Lens Reflex Camera (or DSLR for short) You have a nice lens and you’re happily going around taking photos in auto mode, as you are not too sure what everything on your camera means! So, we here at Clickasnap are going to write a short series about the 3 main settings available on any DSLR (and nowadays many compact cameras) and how to use them, because, let’s face it, the better you are at taking photos the better quality photos we have on the site for you to make money from!
So, what are these 3 main things?
- ISO (International Standards Organisation) this relates to the sensitivity of the film, or in the case of digital cameras the sensitivity of the CCD (Charge Coupled Device) to the photons coming through the lens.
- The exposure time; this is the speed at which the film or the CCD is exposed to the incoming photons (light)
- The F-Stop, this is the amount of light the lens let’s into the camera
[showad block=2]
All 3 of these are incredibly important and setting them correctly is vital to getting the photos you want, in the conditions you have available to you. We aren’t going to tell you how to take your photos but explain in simple clear terms what each one of these things does. Later on we will discuss combining these settings to produce the photo you need.
Right, enough chatter, what is an F Stop and what in the real world does it do?
I attached a Sigma 50mm f1.4 lens (Sigma 50mm F1.4 DG HSM Art Lens for Canon![]() ) onto my camera and fixed the shutter speed at 6 seconds and the ISO at 500. (For now don’t worry about the shutter speed or the ISO) I took 3 photos:
) onto my camera and fixed the shutter speed at 6 seconds and the ISO at 500. (For now don’t worry about the shutter speed or the ISO) I took 3 photos:
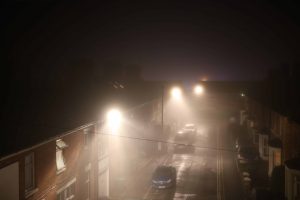
This photo above was taken at F1.4, it is quite a clear photo and features can easily be discerned
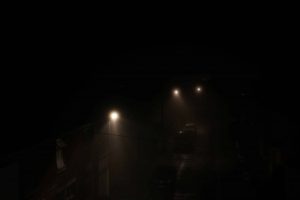
This was taken at F6.3. Same lens, same shutter speed and same ISO. You can clearly see that the features are disappearing fast and you can barely make out the street lights that are clearly shown in the F1.4 image
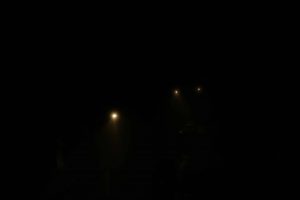
Finally, this was taken at F13, again, same shutter speed and same ISO. You can just barely make out the street lamps let alone any features!
So, what does all of this mean? Quite simply, the higher the F stop the less light gets into the camera and the deeper the depth of field, the lower the F stop the more light that gets into the camera but the shallower the depth of field.
A brief note on depth of field. Whilst when taking night shots like the street view above depth of field isn’t so critical, however, if you are taking portrait shots or animals relatively close up depth of field can have quite an impact. For example the below photo was taken using a Canon 70-200mm F2.8 L ii USM lens at F2.8

As you can see, it is a very small portion of his face that is actually in focus because of the low F stop and the correspondingly shallow depth of field. This can make focusing quite tricky and when shooting in low light conditions this depth of field ‘feature’ has to be taken into account prior to carrying out your shoot. Of course this type of effect can be of great use in photos when defining a single focal point for the eye to look at.
[showad block=2]
Our next article will discuss ISO settings, and after that shutter speed settings when you have an understanding of all 3 prior to carrying out a shoot you must balance these all out to get the desired results. And of course you are welcome to sign up to Clickasnap and start earning money for your photos today!